• $5 flat fee standard shipping and free shipping on orders over $50 (US only)

PAINTS AND BRUSHES

For years, people have been asking me about the paints and brushes that I use on my dolls. I am a firm believer that with thex correct paints and supplies, everyone can paint dolls much better, and without the correct paints and supplies, even the most talented doll artists are at a disadvantage.

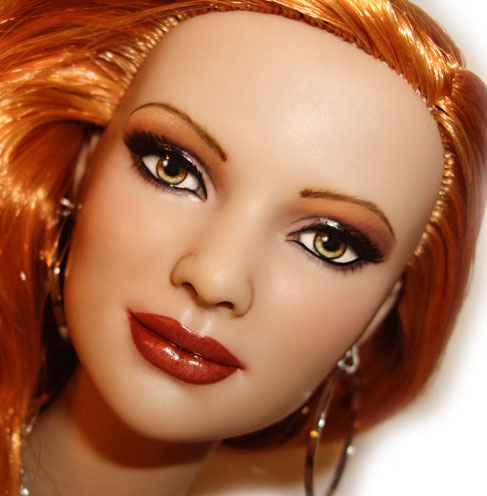
Here's just one example of a Tonner doll that I repainted. I want to give you a very close shot of her eye, to show you what is possible:


The paints offered on Dollyhair are the HIGHEST QUALITY, EASIEST TO USE acrylic paints that you'll ever come across. They have a very thin consistency, but at the same time, they have a very high amount of pigment in them, which allows you to thin them out and, at the same time, still get great coverage. Cheaper paints will just cause frustration for you (trust me, I learned the hard way), once you use the paints below, you will swear by them and you'll never want to use any other paints ever again!

Do you need to buy so many colors of paint? Technically, you don't. But the more colors you have, the easier it will be to use the paints. Here's the thing: realistically, all you need to create ALL of the colors of the rainbow are the following colors: red, yellow, blue, black, and white. From these colors, all other colors can be mixed. But the problem with doll repainting is that it's really necessary to apply 3-4 thin, watered-down coats of paint, as opposed to one thick, goopy coat that shows brushstrokes. This was one of my most valuable early lessons, so remember it well! So, if you mix the correct color on your palette and apply one coat of it to your doll, chances are that it will dry on your palette before you have time to apply a second coat to your doll. Of course, you do have the option of mixing the paint on your palette with the retarder (offered below), and the retarder will slow the drying time, but it probably won't slow it enough to allow you to apply more than two coats to your doll. Sure, you can mix the same color on your palette again, but the odds are that you're not going to get it to be exactly the same color as the first time that you mixed it. So by having more colors at your disposal, you can use them straight out of the bottle, and therefore avoid any frustrating drying time issues :)


BUY PAINTS AND BRUSHES BELOW


DOLL BRUSHES AND SUPPLIES:

Liner brush in size 18/0

This is the best brush I've ever used for doll repainting. It allows you to paint in very fine detail, and it's perfect for painting eyelashes and other thin lines! I use this brush for painting ALL areas of the doll's face. This is the only brush that I use with my paint.

Angular Shader brush in size 1/8

I don't paint with this brush, but I use it to apply chalk pastels as eyeshadow and blush. You just rub the brush bristles on the chalk pastel, and then you scrub the doll's face with the brush! After that, all you have to do is apply a coat of sealant over your chalk pastel! Keep scrolling down if you're interested in buying the best chalk pastels for dolls!


DOLL PAINTS: all doll paints are sold in 1/4 oz. squeeze bottles. One bottle will last you a LONG time!
Titanium White

Titanium White is a stark, opaque white. I use titanium white mixed only with water to apply 3-4 coats to the doll's eyeball, and this gives a perfect "canvas" onto which you can paint the doll's iris. You REALLY need BOTH titanium white AND zinc white.

Zinc White

Zinc White is a soft, translucent, subtle white. When you're trying to avoid the harsh opacity of titanium white, zinc white offers a wonderful alternative. Zinc white is particularly useful when you want to paint a glaze of a lighter color over a darker color. I used zinc white on the doll above's eyeball to depict the reflection of light on her iris. You REALLY need BOTH titanium white AND zinc white.

Iridescent Pearl

A shimmery, pearly silver-white color. Thinned down with water or retarder, and/or mixed with paint, you can create beautiful shimmery eyeshadow shades. If you look at the picture of the doll's eye above, you can see how I used the GOLD version of this paint as a highlight below the doll's brow. The gold version is offered below, but the silver version is just as pretty, and I think it's probably more useful than the gold version. I wish I could capture the color on the swatch to the left, but it basically looks like the inside of a seashell. It's beautiful.

Titan Buff

I guess you could call this a dark ivory. It's a creamy, warm color. It's an interesting shade to use for eyeshadow on a doll, particularly on the eyelid and as a highlight beneath the brow. You can also mix it with red or pink if you want a lighter, pinker lip color, and if you want to warm the pink up a little. Remember to mix it with medium (offered below), because it is on the opaque side.

Hansa Yellow

Hansa Yellow is a translucent yellow. If, for any reason, you need an opaque yellow, just mix a little titanium white into your hansa yellow.

Yellow Ochre

Yellow Ochre is a dark, brownish yellow.

Iridescent Gold

A shimmery, pearlescent gold. Thinned down with water or retarder, and/or mixed with paint, you can create beautiful shimmery eyeshadow shades. If you look at the picture of the doll's eye above, you can see how I used this gold paint as a highlight below the doll's brow.

Raw Sienna

When I ordered it, I expected Raw Sienna to much more brown than it is. However, it is very similar to yellow ochre.

Burnt Umber

A classic medium brown color, burnt umber is perfect for painting eyebrows, and it lends a very natural look to the irises of dolls with brown eyes. It's also great for eyebrows.

Raw Umber

Raw Umber is a pretty, neutral dark brown, perfect for painting the dark ring around a brown-eyed doll's iris!

Burnt Sienna

Burnt Sienna is a reddish brown.

Red Iron Oxide

One of my favorite colors, Red Iron Oxide is a translucent, dark brown orange.The color to the left may not look like much, but once you see this paint in person, you'll understand why I love it so much. It's perfect for glazing because it does not have any opacity to it, and it lends an unbelievable sense of realism when painted in flecks onto a doll's eyes. I used it on the irises of the doll pictured above.

Violet Oxide

Violet Oxide is not as translucent as alizarin crimson (below). Violet Oxide is basically a brownish burgundy color. It's very useful for dark shading on lips. Contrary to its name, it doesn't look violet at all. If anything, the pigment may impart a VERY slight hint of plum to the brownish base, but only a very trained eye would notice the plum tint.

Alizarin Crimson

One of my favorite colors, Alizarin Crimson is a translucent, dark crimson red. Perfect for mixing with medium and creating a natural-colored glaze for lips, and also perfect for mixing it with other colors to create other lip shades. It's a universally natural-looking color for a doll's lips, and it's a must-have.

Napthol Red

Napthol Red is your basic, primary red. It's a must-have simply because it's a primary color, so it's very necessary for you to have in order to mix other colors from it.

Opera Rose

I would really call this color magenta or fuchsia. Painted in a thin glaze, it will take on a brighter and more vivid tone, but painted in thick layers, it will look darker and more subdued. Very versatile, and great for lips!

Rose Pink

Rose Pink is not made by the same manufacturer as the majority of our paints, so you'll find that it's of a slightly thicker consistency. It's not highly-pigmented, but that's what I like about it: in the bottle, it looks like a shocking, fluorescent pink. However, once you paint it onto your doll, you'll notice that it's a subtle, translucent, rosey pink, and it's a really useful color to have!

Dioxazine Purple

This is the perfect purple color!

Ultramarine Violet

Slightly bluer than Dioxazine Purple, and also lighter and more translucent.

Prussian Blue

Prussian Blue is a dark navy blue, perfect for painting the dark ring around a blue-eyed doll's iris!

Phthalo Blue

It's really difficult to capture this color in hexadecimal code, so remember that the paint that you will receive will be a lot more vibrant than the color that you see to your left. Phthalo blue is on the darker side, but not as dark as prussian blue, and it's slightly greener than prussian blue. It's also a lot more vibrant than prussian blue.

Manganese Blue

An absolutely gorgeous translucent blue color! On a blue-eyed doll, this color would be awesome. I have yet to use it on my own dolls, but I'm very excited to use it!

Cobalt Teal

More on the opaque side, and great for painting the light-colored part of a doll's iris before you go over it with darker glazes, this color is such a pretty seafoam blue-green color!

Phthalo Turquoise

It's just an incredible color to see in person. It reminds me of a translucent version of viridian green, for those of you who are familiar with paint pigments. You have to see it to realize how beautiful it is.

Permanent Green Light

I would describe this as a classic kelly green color. It would be awe-inspiring for a green-eyed doll, to really make her eyes pop with bright color.

Chromium Oxide Green

Chromium Oxide Green is a subtle, grayed-down medium green. Along with sap green (below), it's perfect for painting green-eyed dolls.

Sap Green

Sap Green is a gorgeous, translucent dark green, perfect for painting the dark ring around a green-eyed doll's iris!

Shimmering Iron Oxide

Shimmering iron oxide is a translucent charcoal-colored paint with tiny flecks of hematite ore embedded in it. These tiny flecks of metal cause the paint to shimmer and sparkle! This color would really add some drama to a doll's eyeliner!

Carbon Black

Your basic black- indispensable and quite necessary!

Clear Gloss Sealant

Clear gloss sealant is a must-have. Not only might you want to use it to give the doll's lips a glossy finish, but you'll need to use it to seal the eyeballs as well. I use it not only for sealing my paints after my painting is finished, but I also use it to give an ultra-smooth surface onto which to apply my glazes. For instance, after painting the doll's eyeball with titanium white paint, I will seal this layer of titanium white paint with the gloss sealant, and after that, I have a completely brushstroke-free and unporous surface onto which I can begin painting the iris. This gloss finish is very forgiving if you make a mistake with your glaze, as you can wipe the glaze off of it before it dries. Also, an unsealed coat of paint is very porous, and porosity is not a good thing when you're applying glazes. Remember to seal your titanium white eyeballs with this gloss sealant before you start painting the irises, and you'll be good to go! Normally, I use it straight out of the bottle, without mixing it with any water. Sealants will give your paint a protective finish.

Clear Matte Sealant

TEMPORARILY OUT OF STOCK

Clear matte sealant is also a must-have. Certain areas of the face, particularly the eyelids, will need to be given a matte finish... as you know, skin is not glossy! This matte sealant is normally too thick straight out of the bottle, so I like to mix it with 50% water before applying it to the doll. This high quality matte sealant will not cause any cloudiness to occur with your paints, unlike some of the cheaper matte sealants! Sealants will give your paint a protective finish.

Clear Satin Sealant

Clear satin sealant is basically really only useable on the lip area, but it's a wonderful sealant to use when you don't want the lips to be too glossy or too matte. It imparts a subtle sheen to the surface of the paint, and it's very pretty. Sealants will give your paint a protective finish.

Retarder

Retarder is also a must-have. This retarder has the consistency of water, and what it will do for you is it will retard (slow down) the drying time of your paints, which is a necessity when you're painting certain features, like eyelashes. Have you ever had your paintbrush dry out mid-eyelashstroke? So frustrating! That will not happen anymore with this retarder. Remember , it's only going to retard drying time by about a minute or so, so you'll still need to work quickly with it, but I truly don't know what I would do without it.

When painting eyelashes, press down slightly with the brush, and then, as you paint your brushstroke, lift away from the doll with your brush as you move it along. This will allow you to create tapered eyelash hairs.

Medium

Medium is also a must-have, because it allows you to create glazes and blend colors, which is absolutely necessary for realistic-looking dolls. This medium has a paint-like consistency, so it's definitely not as watery as the retarder. After I've painted the white iris with titanium white paint, and after I've sealed the titanium white paint with gloss sealant, I will mix this medium with one of the darker-colored paints, and I will begin painting the iris. If you look at your own eyes, you'll see that your iris does not have a sharp delineation into the white of your eye- the color blends a little bit. So, by painting this iris in 3-4 glazes of thin color, you not only attain a more natural-looking repaint, but it's also more forgiving in case you aren't able to paint a perfect circle on your first try. With a really thin glaze of paint, you can refine your circle by applying more layers of glaze, eventually attaining a dark-colored iris, which will be the foundation for the rest of the eye's paint. After you've painted the dark iris, you'll apply light-colored paint to the iris in layers of glaze as well. After that, you'll paint glazes of the darker flecks of color on top of the light-colored paint, and that will give the eyes depth and realism. Glazes allow the colors underneath them to still show through, and you can see this if you look at the doll's eye above. You can also do wet-into-wet techniques with this medium, which will allow you to blend one color into another and create gradient effects. In addition, if you look at the photo above, you'll notice that I mixed a very small amount of black paint into my medium, and I used this mixture as a glaze to create a shadow on the eyeball underneath the upper eyelashes. You really do need medium in order to paint a doll successfully!

Pure Acetone

Pure Acetone is the best thing to use if you want to remove your doll's factory paint. Just soak a q-tip in the acetone, and then "scoop" (don't rub) the paint off. A toothpick dipped into pure acetone is also a wonderful tool for cleaning up any part of your repaint and refining any lines. After using pure acetone, remember to swab your doll's face with a mixture of baking soda and water, which will neutralize any remaining acetone.

-Check back in the future for new colors of paint!